Item serialization is an important process during continuous integration as it helps ensure the consistency and reliability of the build and deployment process. It assists developers in sharing items and speeding up development. If a new feature requires a content page, it can be included within the project. Other developers can work with the same items, without having to recreate them.
It is also great to have items included to be shared across different environments. Templates, designs or themes for example. During a deployment, these items can be updated and published, and the new features or updates will be directly available to the Sitecore instance.
In this post we will talk about the Sitecore CLI (Sitecore Command Line Interface), how to set it up and how to use it.
First things first: Setting up Sitecore Serialization
Since Sitecore Serialization is not available for earlier versions, make sure you are using Sitecore version 10.0 or later. Next to that, you also need to have .Net Core 3.1 installed on your server.
How to configure and use Sitecore CLI
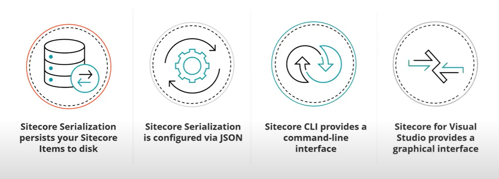
In the past, most projects used either Hedgehog TDS or Unicorn to support item serialization. But now, starting from Sitecore version 10.0, a new tool has made its entrance: Sitecore CLI (Sitecore Command Line Interface).
Sitecore CLI lets you define module. JSON files in which you can specify for your module which items need to be serialized. The module files can be set in two ways: per feature of your solution or in general for your entire platform. By keeping these files relevant per feature, it is easier to understand what the module is meant to do.
The module defines a set of item paths and what needs to be serialized with Sitecore.
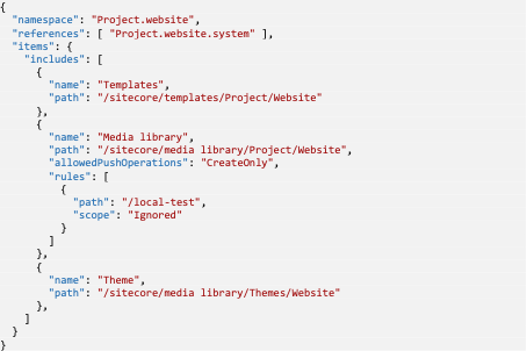
Configure JSON for serialization
The module.JSON files make it easier to specify what exactly it is you want to serialize. Using the properties and examples below, you can configure all your desired serializations.
Properties for JSON file:
- name
- Unique name for serialisation
- path
- Path of the item to serialize
- scope
- Define what content to serialize
- SingleItem: Only the item specified from the Path
- ItemAndChildren: Item specified in path with immediate children
- ItemAndDescendants: Item specified in path including all the descendant items
- DescendantsOnly: Only the descendent items specified form the path
- Ignored: All children and descendants will be ignored, unless in previously matched.
- database
- Selected database to sync. This can be “master” or “core”
- maxRelativePathLength
- Specify how long the path may be, by default this is 130 characters
- If the length has been reached it will create a new hashed folder in the root of the directory
- allowedPushOperations
- Define how content can be serialized
- CreateOnly: This will only create the item, if it already exists it will be ignored.
- CreateAndUpdate: Creating and updating items. If it already exists but is modified, it will update the item. This setting will not remove items.
- CreateUpdateAndDelete: Items will be created, updated and removed.
- Define how content can be serialized
- Define what content to serialize
Example structure of module.JSON serialization file
Using Sitecore CLI to synchronize items
There are multiple ways you can use the CLI synchronization.
Installing Sitecore Command Line Interface
In order to use CLI, first download a package to install the Sitecore Management Services. You need the Sitecore Management Services to support Sitecore CLI and Sitecore for Visual Studio.
Download the package from Sitecore here: https://dev.sitecore.net/Downloads/Sitecore_CLI.aspx
Once the package installation is complete, you can move forward with the following steps:
- Open a terminal with administrator privileges.
- Run the following command to install CLI:

- Initialize your project

- Install the Publishing and Serialization plugins:

- Verify if Sitecore CLI works

- The output of this command should look like:
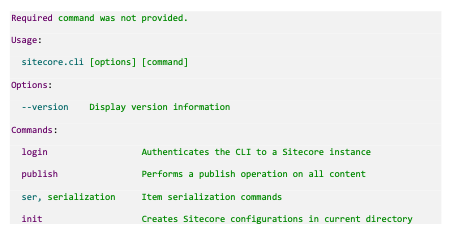
- The output of this command should look like:
Using CLI from PowerShell
First, login into Sitecore. You can do this by running the command in PowerShell and navigate to you Sitecore Project folder:
A browser will open, and you can enter your Sitecore Credentials. Once this is done you can close your browser.
These are the most frequent commands:
- Pulling the Sitecore items from your instance to local disk

- Pushing items from your local disk to Sitecore instance

- Publishing items to web database

Using Visual Studio
Sitecore for Visual Studio plugin gives you a graphical user interface. If you are used to Sitecore TDS, this plugin works similar. After installation, you can access the plugin within Visual Studio by going to Views à Other Windows à Sitecore Module Explorer.
Once you have installed and have the right license configured you will be able to create your sitecore.json file.
An example of this file: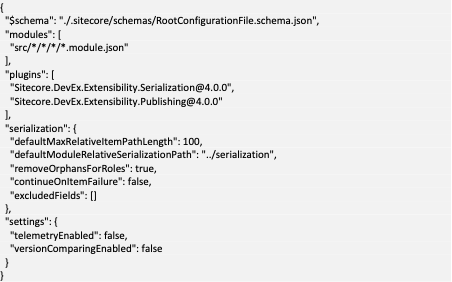
This sitecore.json file loops through all your module.json files. Then, once you open the Sitecore Module Explorer, it will contain all your modules.
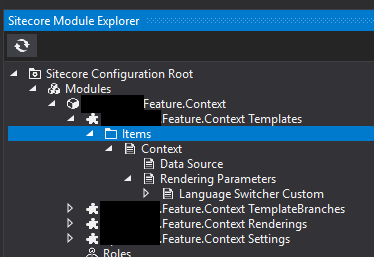
You can pull or push each individual module, or you can do this for all items on Sitecore Configuration Root level.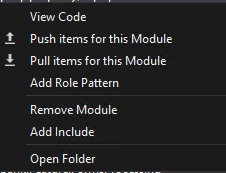
Using Sitecore CLI during deployment pipeline

With Sitecore CLI, it is easy to create your serialization step within your deploy pipeline.
In order to make this happen follow these steps:
- During your build steps include a Create CLI package step
- During the deployment to your CM environment include a Deploy CLI package
Deployment of your CLI package is only required on your CM environment for the items will be published if specified to the CD environment.
Creating your CLI package
This is an example of the PowerShell script to create your package:
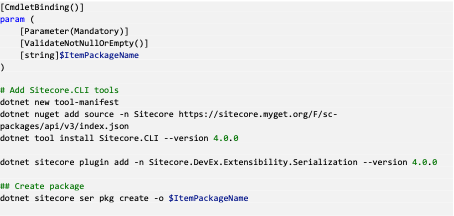
First, include the nuget source from Sitecore. Second, install the Sitecore.CLI tool.
Then you can call the serialization to create your package.
Deploy your CLI package
During your deployment step, you can then use the following example to serialize your package: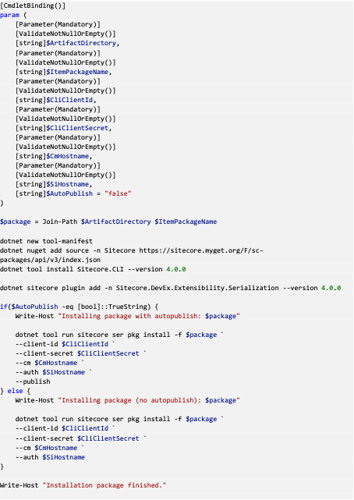
Once again, begin with the installation of the Sitecore.CLI tool.
By calling the serialization to install the package, you can choose to use an automated publish or skip the publish and do this manual afterwards.
Sitecore CLI: our final conclusions
The Sitecore CLI is a great tool to get everything within Sitecore shared across multiple developers and environments.
The option to choose between the command line and graphical Visual Studio plugin gives every developer the freedom to select their preferred way of working.
Using the Sitecore CLI makes it easy and quicker to get your features deployed to all Sitecore environments having the right templates or settings items that it needs.
We hope this article has given you some great ideas on how to use Sitecore CLI.
Do you want to more information what we can accomplish together? Let's talk!
Get in Touch
Ready to take your digital experience to the next level? Feel free to contact us to learn more about our services and how we can help you leverage the full potential of your digital marketing.
Tell us about your project
And we'll come up with a tailor-made solution
Get in touch with one of our consultants to find the perfect match that fits your needs and enables you to grow.