By Danny Paul van Iersel, 04-6-2024
Configure Sitecore to use B2c
For the connection with B2C on Sitecore Authentication we use OpenIdConnect.
Important notice when using OpenIdConnect and using the TokenClient to read the token we receive. We use the IdentityModel package, the version is crucial because Sitecore uses this as well. For Sitecore the Identity Server from the Sitecore Back-End login uses version 3.6.1.
This must match with our implementation, otherwise we will receive dependency issues when trying to login to Sitecore itself.
Parts we need to make the B2C connection work:
- Config file for pipeline and federated authentication
- Set a pipeline for owin.identityProviders and add a processor
- Create a FederatedAuthentication and include the reference to our IdentityProvider
- Configure the IdentityProvider with additional transformation we want to use for our claims
- Create a Sitecore.Owin.Authentication.Services.DefaultExternalUserBuilder - CustomExternalUserBuilder
- Create IdentityProvidersProcessor
- The middleware we use to handle our OpenIdConnect requests.
Registratie van B2C in Azure
Within your Azure Subscription, select “Create a resource”. Search for B2C.
Create an Azure Active Directory B2C.

We have the option to either:
- Create a new Azure AD B2C Tenant
- Link an existing Azure B2C to the current Subscription
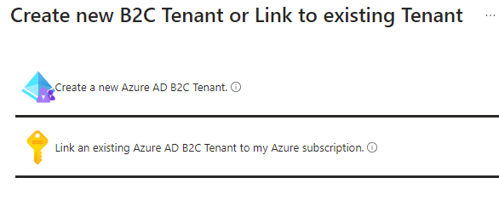
For this demo we created a new Tenant.
Once we have created a new Tenant we will find this Tenant under our resources.
On the overview you will find the option to open the B2C Tenant in the middle of the screen.

This will redirect you to the new Tenant.
It sometimes might be confusing that all of your resources appear to have disappeared. This is because we are on a different directory now. This directory is specially dedicated to the B2C Tenant.
When developing and changing from 1 directory to the other it can cause you to lose some directions. Keep in mind to check your directory at the top of your screen underneath your profile name (or email).
From the B2C we can configure a default user flow. This is the easiest way to test our connection and make sure our redirects and callbacks work correctly.
Go to the user flows and choose “New user flow”. We find it easy to use the sing up and sign up in flow because this already contains several functions we will be needing later on.

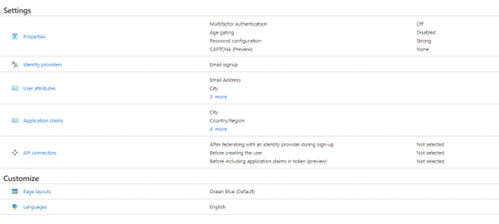
You can then configure the policy.
- Properties
- Identity providers
- You could connect with other providers. The current list that are supported are:

- You could connect with other providers. The current list that are supported are:
- User attributes
- Select what attributes are available for the users
- This is used for the signup flow and users will be asked to fill in this information
- Application claims
- The claims that are send to your application
- API connectors
- You can connect with other API’s to add additional logic before creating a user from the Sign Up flow
- Page layouts
- Customize your layout of the login or signup flow
- Languages
- Possibility to use translation
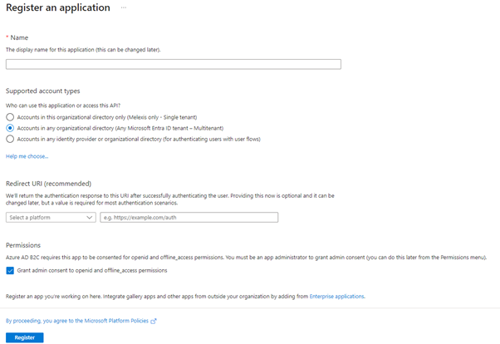
Once we have our flow configured we need to register our own application. This makes it possible for our application to connect with our B2C.
Add a new registration:
- Fill in the name of your application
- Choose what accounts are supported
- Redirect URI:
- This is the URL to redirect to our application once a user has signed in
- Example https://Your.Domain/signin-oidc
Configuration file
Now we will configure our code. First let us look at the configuration file that needs to be patched.
<configuration
    xmlns:patch="http://www.sitecore.net/xmlconfig/" xmlns:role="http://ww.sitecore.net/xmiconfig/role/">
    <sitecore role:require="Standalone or ContentDelivery or ContentManagement">
        <pipelines>
            <owin.identityProviders>
                <processor type="Project.Site.Web.IdentityProviders.B2C, Project.Site.Web" resolve="true" />
            </owin.identityProviders>
        </pipelines>
        <federatedAuthentication type="Sitecore.Owin.Authentication.Configuration.FederatedAuthenticationConfiguration, Sitecore.Owin.Authentication">
            <identityProvidersPerSites hint="list:AddIdentityProvidersPerSites">
                <mapEntry name="all" type="Sitecore.Owin.Authentication.Collections.IdentityProvidersPerSitesMapEntry, Sitecore.Owin.Authentication">
                    <sites hint="list">
                        <site>website</site>
                        <site>Project</site>
                    </sites>

                    <identityProviders hint="list:AddIdentityProvider">
                        <identityProvider ref="federatedAuthentication/identityProviders/identityProvider[@id='B2C']" />
                    </identityProviders>

                    <externalUserBuilder type="Project.Site.Meb.IdentityProvlders.UserBuilder.CustomExternalUserBuilder, Project.Site.Web">
                        <param desc="isPersistentUser">false</param>
                    </externalUserBuilder>
                </mapEntry>
            </identityProvidersPerSites>

            <identityProviders hint="list:AddIdentityProvider">
                <identityProvider id="B2C" type="Sitecore.Ovin.Authentication.Configuration.DefaultIdentityProvider, Sitecore.Owin.Authentication">
                    <param desc="name">$(id)</param>
                    <param desc="domainManager" type="Sitecore.Abstractions.BaseDomainManager" resolve="true" />
                    <caption>Log in or create B2C Account</caption>
                    <icon>/assets/Microsoft.png</icon>
                    <domain>sitecore</domain>
                    <transformations hint="list:AddTransformation">
                        <transformation name="map role to idp" type="Sitecore.orin.Authentication.Services.DefaultTransformation, Sitecore.Orin.Autheatication">
                            <sources hint="raw:AddSource">
                                <claim name="idp" value="B2C" />
                            </sources>
                            <keepSource>true</keepSource>
                        </transformation>
                    </transformations>
                </identityProvider>
            </identityProviders>

            <propertyInitializer type="Sitecore.Owin.Authentication.Services.PropertyInitializer, Sitecore.Owin.Authentication">
                <!-- global mappings go here -->
                <maps hint="list">
                    <map name="Email to Email" type="Sitecore.0win.Authentication.Services.DefaultClaimToPropertyMapper, Sitecore.Owin.Authentication">
                        <data hint="raw:AddData">
                            <source name="http://schemas.xmlsoap.org/ws/2005/05/identity/claims/emailaddress"/>
                            <target name="Email" />
                        </data>
                    </map>
                </maps>
            </propertyInitializer>
        </federatedAuthentication>
    </sitecore>
</configuration>
Here we have the following sections configured:
- Pipeline:
- The pipeline to include owin.identityProviders
- Federated Authentication
- We configure the federated authentication that it uses our identity provider
- IdentityProviders
- Configuration of the Identity Provider
- Parameters
- Caption
- Domain
- Transformations
- Configuration of the Identity Provider
Next we need to configure our Provider Processor.
Provider Processor
In our Provider Processor we configure the settings for the Identity provider and handle the options to redirect and callbacks.
Here you see the basic setup for our Identity Provider Processor.
using IdentityModel.Client;
using System;
using System.Threading.Tasks;
using Project.Site.Web.Configuration;
using Microsoft.Owin.Infrastructure;
using Microsoft.0win.Security.Notifications;
using Microsoft.Owin.Security.OpenIdConnect;
using Owin;
using Sitecore.Abstractions;
using Sitecore.Diagnostics;
using Sitecore.Owin.Authentication.Configuration;
using Sitecore.Owin.Authentication.Pipelines.IdentityProviders;
using TheReference.DotNet.Sitecore.ApplicationSettings;
using Microsoft.IdentityModel.Tokens;
using Microsoft.IdentityModel.Protocols.OpenIdConnect;
using Sitecore.Owin.Authentication.Extensions;
using Sitecore.Owin.Authentication.Services;
using System.Security.Claims;
using System.Ling:
using Sitecore.Links;

namespace Project.Site.Web.IdentityProviders
{
    public class B2C : IdentityProvidersProcessor
    {
        protected override string IdentityProviderName => "B2C";
        private readonly ISettingsRepository _settingsRepository;
        protected IdentityProvider IdentityProvider { get; set; }

        public B2C(FederatedAuthenticationConfiguration federatedAuthenticationConfiguration,
                ICookieManager cookieManager,
                BaseSettings baseSettings,
                ISettingsRepository settingsRepository)
            base(federatedAuthenticationConfiguration, cookieManager, baseSettings)
        {
            _settingsRepository = settingsRepository;
        }

        protected override void ProcessCore(IdegntityProvidersArgs args)
        {

        }
    }
}
In the ProcessCore method we will add the following:
protected override void ProcessCore(IdentityProvidersArgs args)
{

    Assert.ArgumentNotNull(args, "args");
    IdentityProvider this.GetIdentityProvider();


    //should be taken fron configuration or settings within your sitecore environment
    var clientID = "your b2c client id";
    var clientSecret = "your b2c secret";
    tenant = "your tenant Name";
    var policy = "Policy Name";
    var redirecturi= "https://Your.Domain/signin-oidc";
    var instanceUrl = "https://" + tenant + ".b2clogin.com/{0}/{1})";
    var tenantDomain = tenant + ".onmicrosoft.com";

    var authenticationType = this.GetAuthenticationType();

    var openIdAuthOptions new OpenIdConnectAuthenticationOptions(authenticationType)
    {
        //Generate the address using the tenant and policy information
        MetadataAddress = String.Format(instanceurl + "/v2.0/.well-known/openid-configuration", tenantDomain, policy),

        // These are standard OpenID Connect parameters, with values pulled from web.config
        ClientId = clientID,
        RedirectUri = redirectUri,
        PostLogoutRedirectUri = redirectUri,
        ResponseType = "code id_token",

        // Specify the callbacks for each type of notifications
        Notifications = new OpenIdConnectAuthenticationNotifications
        {
            //RedirectToIdentityProvider OnRedirectToIdentityProvider,
            AuthorizationCodeReceived = OnAuthorizationCodeReceived,
            AuthenticationFailed = OnAuthenticationFailed
        },

        // Specify the claim type that specifies the Name property.
        TokenValidationParameters = new TokenValidationParameters
        {
            NameClaimType "name",
            ValidateIssuer= false
        }
        Caption = Identityprovider.Caption.
        Authority = String.Formt(instanceUrl, tenantDomain, policy),
        UseTokenLifetíme false, //indicates if we want authentication session lifetime(authentication cookie) to match lifetime of the token
        ClientSecret = clientSecet, //Client application Secret
        Scope = "openid" // openid offline_access are used per oidc specification. If you want to access specific or custom scopes in the response will have to add 'token' to ResponseType.
    };

    args.App.UseOpenIdConnectAuthentication(openIdAuthOptions);
}
The variables like ClientID and Secret should be stored in any configuration file or site settings within the Sitecore environment.
The maximum age of the Client Secret is 24 months, keep in mind that this variable needs to be adjustable.
We create an new set of options for the OpenIdConnectAuthenticationOptions.
The MetadataAddress contains the configuration of the B2C URL’s. It will guide the user to the login screen designed for the policy we have configured.
With Notifications we set the callbacks once the user has logged in. If the authentication has failed or if we receive a authentication code.
In the end we need to register our application to use the authentication. With args.App.UseOpenIdConnectAuthentication(openIdAuthOptions); we set the application to use this configuration for our identity provider.
private async Task OnAuthorizationCodeReceived(AuthorizationCodeReceivedNotification notification)
{
    var clientID = "Your b2c Client ID":
    var clientSecret = "You b2c Secret";
    // Exchange code for access and ID token
    var tokenclient = new TokenClient (string.Concat(notification.options.Authority, "/oauth2/v2.0/token"),
                        clientID, clientsecret);
    var tokenResponse = await tokenClient.RequestAuthorizationCodeAsync(notification.Code, notification.RedirectUri);
    if (tokenResponse.IsError)
    {
        HandleAuthorizationError(notification);
        return;
    }

    var claimsIdentity = notification.AuthenticationTicket.Identity as ClaimsIdentity;
    var firstName = claimsIdentity.Claims.FlrstorDefault(c=> c.Type == "http://schemas.xmlsoap.org/ws/2005/05/identity/claims/givenname")?.Value;
    var lastlame - claimsIdentity.claims.FirstOrDefault(c => c.Type == "http://schemas.xmlsoap.or:/ws/2005/05/1dentity/claims/surname")?.Value;
    var nameArray - new[] ( firstName, lastName );
    string fullName = string.Join(" ", nameArray.Where(s -> !string.IsNull0rEmpty(s)));
    claimsIdentity.Addclaim(new Claim("FullName", fullName));
    notification.AuthenticationTicket.Identity.ApplyClaimsTransformations(new TransfornationContext(this.FederatedAuthenticationConfiguration, this.IdentityProvider));

    var dashboardPageUrl = "%2fDashboard";
    var returnUri = "/identity/externallogincallback?ReturnUrl=" + dashboardPageUrl + "&sc_site=website&authenticationsource=Default";

    var requestedDomain = _settingsRepository.GetSetting(Settingkeys.InternalGoogleSamlProviderSSOServiceEntityID);
    if (string.IsNullOrEmpty(requestedDomain))
    {
        requestedDomain = "https://Your.Domain";
    }

    notification.AuthenticationTicket.Properties.Redirecturi = new Uri(requestedDomain + returnUri).ToString();
}

private void HandleAuthorizationError(AuthorizationCodeReceivedNotification notification)
{
    var authErrorRelativePath = "/500-error";
    // Log Error
    notification.HandleResponse();
    notification.Response.Redirect(authErrorRelativePath);
}
Summary of our implementation
We have setup the provider and configured the following settings to be used:
- Tenant
- The Tenant name of our B2C Azure Active Directory
- Policy
- The Policy we have configured within the Azure B2C to use for our login/signup flow
- Redirect URL
- The URL where we are returning to after logging in for example https://<Your Sitecore URL>/signin-oidc”
- Client ID
- The Application (client) ID from the application registration
- Client Secret
- The Secret we have configured on the B2C application registration
- Keep in mind the maximum age of this secret is 24 months
- The Secret we have configured on the B2C application registration
We can now setup our OpenIdConnectAuthenticationOptions. The options we set are:
- MetadataAddress
- ClientId
- ClientSecret
- RedirectUrl
- ResponseType
- Notifications (a type of OpenIdConnectAuthenticationNotifications)
- Here we can define the tasks to execute when Authorization Code has been Received or Authentication has Failed.
- TokenValidationParameters
- Scope
The final part is to register our application to use the OpenIdConnect:
args.App.UseOpenIdConnectAuthentication(openIdAuthOptions);
Conclusion
After setting up our provider we need a page to show the login methods.
var args = new GetSignInUrlInfoArgs("website", url);
args.Result.ToList();
By using this we can loop through our login possibilities. It is great to work with and very easy to customize.
To know how to configure the B2C custom policies you can read our second part: Sitecore authentication with Azure B2C Custom policies Part 2
Are you having troubles with your setup for authentications or need assistance? Contact us.
We are happy to help you.
Contact ons
Ready to take your digital experience to the next level? Feel free to contact us to learn more about our services and how we can help you leverage the full potential of your digital marketing.
Tell us about your project
And we'll come up with a tailor-made solution
Get in touch with one of our consultants to find the perfect match that fits your needs and enables you to grow.